
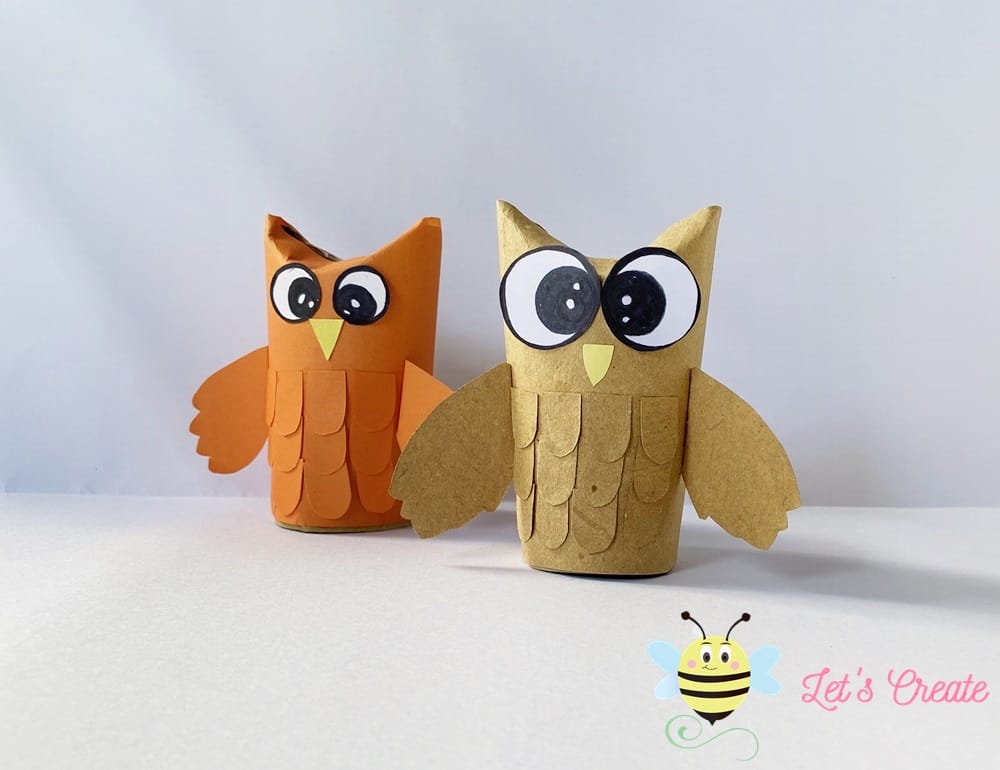
Toilet Paper Roll Owl Easy Craft (+3 Templates)
Learn how to make cute 3D toilet paper roll owls within 15 minutes with our step-by-step tutorial. You’ll also find 3 free owl templates in this article.
Are you like me? constantly thinking of making fun crafts out of toilet paper rolls? If you want to do some fun fall crafts with your kids this weekend, don’t throw away those tissue paper rolls. Check out the supply list above and get everything you need to make these adorable Tissue Paper Roll Owl Crafts for Kids.
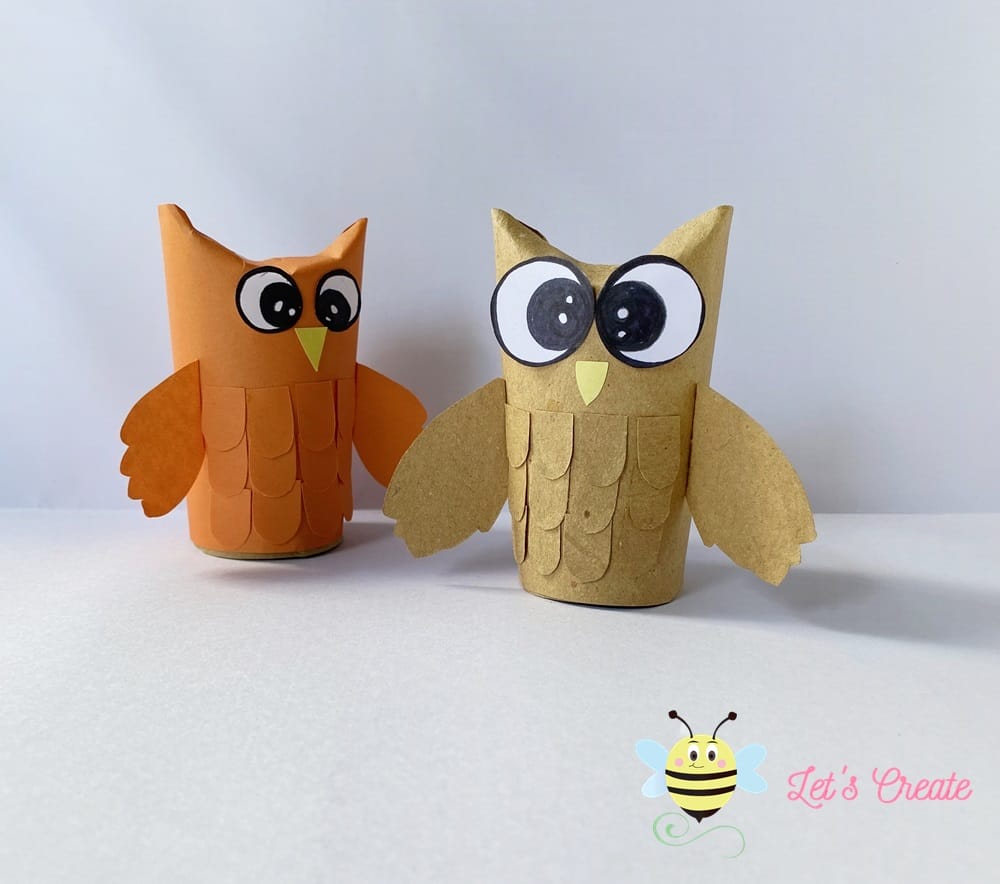
This amazing fall recycling craft doesn’t require any fancy craft supplies. You probably have all of these supplies in front of you. And with our free 3D paper owl template, you can make this craft without much effort. Download and print the owl template to get started on this art. You can use colored printable templates and also a blank template.
If you enjoyed this toilet paper roll owl craft and you want to make more crafts using FREE templates check out Arty Crafty Bees crafts with free templates.
How to Make a Toilet Paper Roll Owl Ornament
Supplies
- Tissue paper roll.
- Colorful craft papers.
- Pencil.
- Ruler.
- Scissors.
- Glue.
- Marker pens.

Tissue Paper Roll Owl Printable Template.
In this tutorial, you’ll get 3 free owl templates.
1. Template 1.
2. Template 2.
3. Template 3.
Toilet Paper Roll Owls Instructions
In this toilet paper roll owl step by step tutorial, we will show you how to make an easy owl craft out of a toilet paper roll. This is a perfect project for kids and toddlers.
Step 1: Prepare your tissue paper roll.

Cut out a rectangular orange craft paper according to the size of your tissue paper roll.
Apply craft glue on one side of the rectangular orange craft paper.
Then, take your tissue paper roll and wrap the craft paper around the tissue paper roll.
Make sure the tissue paper roll is wrapped nicely and evenly.
Step 2: Shape your tissue paper roll.

Press the top front part of your tissue paper roll inwards.
Similarly, press in the top backside of the tissue paper roll inwards.
This will create two pointed edges on both sides of the tissue paper roll.
Step 3: Cut out the feathers.
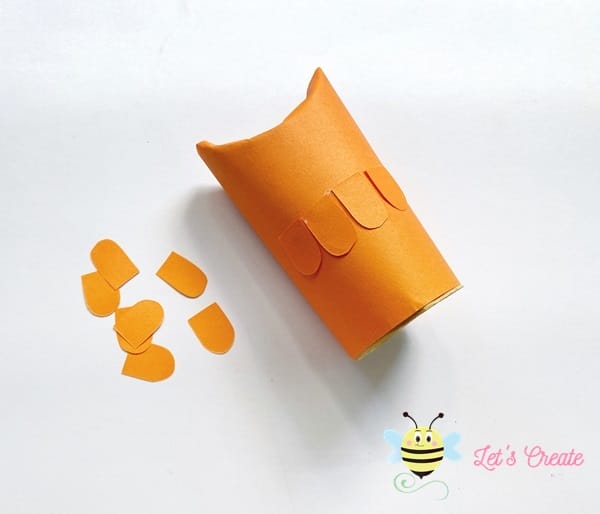
Cut out the feathers from the PDF template.
Start glueing the feathers on the bottom half of the tissue paper roll.
You will need to glue 4-5 feathers on each row.
Step 4: Glueing the feathers.
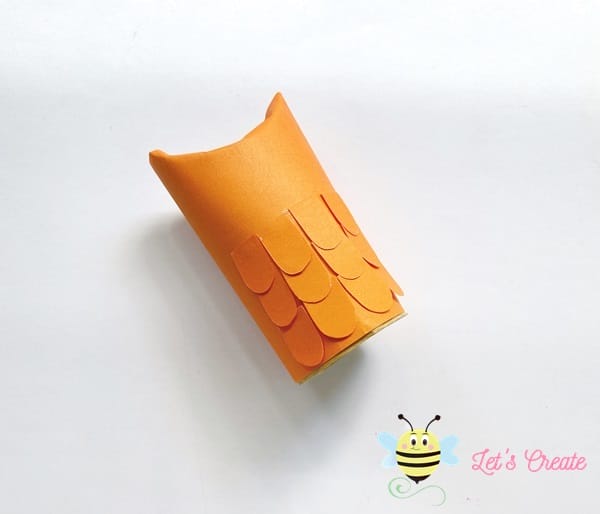
Fill in the whole bottom half of the tissue paper roll with the feathers.
And, allow the glue to dry down completely.
Step 5: Draw the eyes.

Again, use the PDF templates to cut out the eyes for the owl.
You can also draw eyes on white circular paper using marker pens.
Glue the owl’s eyes on the top part of the tissue paper roll.
Step 6: Cut out the wings.

Cut out the wings for the owl from the PDF template.
Slightly fold the sides of the wings. And then, apply glue on the folded areas.
Step 7: the beak and final step.
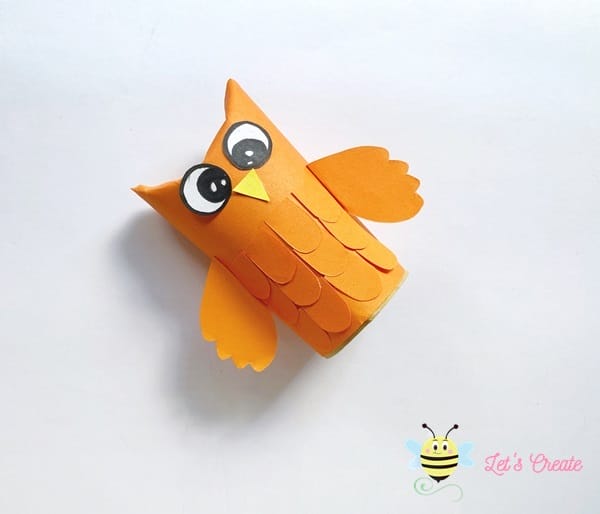
Glue the two wings on two sides of the tissue paper roll, leave the glue to dry down.
And now for the final step, glue the owl’s beak beneath the two eyes to finish off making your tissue paper roll owl craft.
Was this fun to make? You can use these tissue paper roll owls to decorate your home for this fall season. It’s easy and educational for children. Please stay tuned here on our blog for more recycling kids crafts.
How to Use this Toilet Paper Owl Craft?
We mainly focused on making a school craft project. But, this kids toilet paper roll owl art project might be beneficial for kids and toddlers in many ways. For example, They can use this as an owl puppet. Making and playing with this owl puppet would help them to improve their motor activity as well as creativity. On top of that teachers can make this 3d owl craft to teach students the importance of recycling and how to turn waste into a beautiful craft.
Was this fun to make? You can use these toilet paper roll owls to decorate your home for this fall season. It’s easy and educational for children. Please stay tuned here on our blog for more recycling kids’ crafts.


This looks so cute… I’ll definitely try making this craft❤️